What Is A
Tooth Crown?
What is a tooth crown? The answer to that depends to an extent on the reason for doing the crown (or "cap") in the first place.
There are just 4 reasons to get a dental crown.
- First - cosmetic. The tooth is either the wrong color, the wrong shape (bigger or smaller than it should be), or in the wrong position ie. twisted.
- Second - the tooth has been weakened by big fillings, and needs something to protect it.
- Third - The tooth has had a root canal treatment.
- Fourth - To replace a missing tooth when the crown will be attached to a dental implant.
ALL dental crown procedures are basically similar, with only small differences here and there depending on the reason for needing a crown.
BUT WAIT - what IS a tooth crown? (sometimes it's called a dental cap). A dental crown is like a thimble, that goes over your own natural tooth and hides and protects whatever is under it. Of course, it's not shaped like a thimble - it's shaped like a tooth!
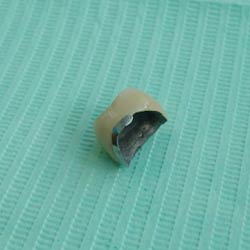 Looking at the "inside" of a crown
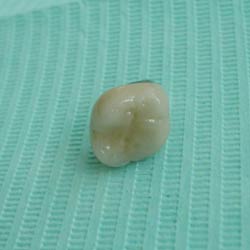 Turned around, now we are looking at the biting surface of the crown.
Let's look at the basic essentials of any dental crown procedure, and then after that I'll explain the things that may be different, depending on the reason for getting your crown.
What Is a
Tooth Crown?
What's involved in a dental crown procedure?
The entire procedure can be divided into 3 sections, or 3 appointments.
- Assessment and preliminary work if needed.
- Preparation of the tooth, to make it the correct shape, and taking molds.
- Fitting the crown to the tooth, running checks and making adjustments as required.
The precise steps that a dentist must follow for a crown depend on why the crown is being planned, and what you hope to achieve by getting the crown. He will need to think about how he wants the tooth to look with regard to it's position, size and color.
How can he do this?
What Is a
Tooth Crown?
At the first appointment, your dentist will take some X-rays of the tooth, and the tooth root (or the dental implant). He needs the make sure that the foundation for the crown will be strong enough. He will look for any signs of decay, leaking fillings, cracks in the tooth or root, or any evidence that the nerve may be dead.
He must also check the bone around the tooth, to make sure that there isn't a problem with gum disease. If he is checking a dental implant, he will make sure that the implant is secure, and that healing is complete.
He will then take a mold (or "impression") of your upper and lower teeth. Then he will send these off to the dental laboratory, to be cast up in dental plaster. When he gets the plaster models of your teeth back from the lab, he will trim the tooth that needs a crown, and send it back to the lab again to get it built up with white wax in the correct shape and position.
This is called a "wax-up". When it comes back from the lab again, he can look at the wax-up with you, and make sure that you are happy with the shape, size and position of the wax tooth. If you are both happy with the lab result, then the dentist can start work.
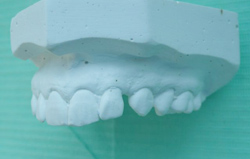 model of "before"
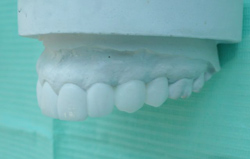 wax up of proposed crowns
At the second appointment, it's time to prepare the tooth for the crown. This means trimming it to make it the correct shape for the crown.
The very first step is to get your tooth REALLY numb. Your dentist will normally apply a surface anesthetic, such as a spray or a gel, to the gum over the tooth. This will numb the gum surface a little. Then he will slowly and carefully inject some local anesthetic. You'll feel your lip going numb within 3 to 5 minutes. You can read more about this at Dental Anesthetics. (How to get a painless shot).
Then he will take a new impression of your teeth, to use in making up the temporary crown after trimming the tooth down. This also serves as a record of the starting situation. After that, the dentist will drill down the tooth a bit to make room for the thickness of the dental crown (about 0.5mm to 1.5mm depending on the material - read more about this at Dental Crown Cost).
This part of the dental crown procedure can feel like it's going on for ages! There will be the water spray from the dental drill, and the dental assistant will be trying her best to vacuum the water away.
Nevertheless, water will start to build up at the back of your throat, and you need to lift your hand every few minutes to indicate to the dentist that you need a break to swallow.
It's important that you DO NOT try to swallow with your mouth open and the dentist still working. While it MAY be possible to do this safely, it usually causes your mouth and jaw to move slightly. This might seem like a very small movement, but to the dentist it will seem like a big movement.
This is important, because the dentist is trying to drill your tooth extremely precisely. Many dentists will even wear magnifying glasses (loupes) or perhaps even use an operating microscope. This magnification makes even the tiniest movement seem huge to the dentist!
What Is a
Tooth Crown?
SO, if you want to help your dentist to do a great job for you, try to keep as still as possible! If you need to swallow or take a break, lift your left hand slowly to indicate this!
After the dentist has finished drilling your tooth down to the shape he wants, he needs to check that the shape is correct. He will do this in several ways;
- First, he will look at the prepared tooth or teeth from all angles. He will do this by using a mirror, and by leaning over you from both sides, front and back, to see how the job looks. It may seem strange to you that he's leaning over you at odd angles, but it's for a good reason!
- Next, he needs to make sure that there is enough of a gap between the prepared tooth and the opposing tooth that will bite on the new crown. The first way he will do this is to ask you to bite down gently, until all your teeth are meeting normally. Then he can look closely to see if there's daylight between the prepared tooth and the opposing tooth.
- Sometimes he will also ask you to bite on a wax wafer too. If this shows that the wax has been bitten through, then he needs to make a bit more space by drilling down the tooth a fraction more. On the other hand, if the wax is left unmarked by the prepared tooth when you bite, then there is enough space.
- Finally, he will want to check that he has taken enough enamel off the tooth to allow the dental laboratory to build up the new crown with thick enough walls to be strong, without looking like a bulky or fat tooth. The dentist may do this by using the initial impression (the one from before he's done any drilling), to make an acrylic temporary crown.
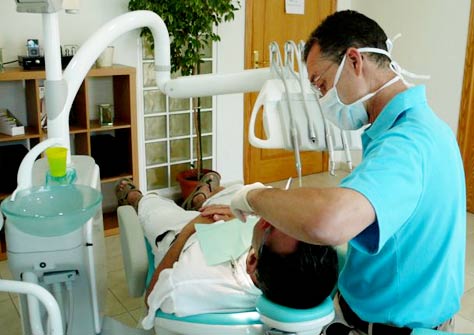 Working on a dental crown procedure
After your dentist is happy with the shape and size of your prepared tooth (or teeth), the next step is to take a recording of that tooth shape in order to construct the new crown. This can be one in one of 2 ways;
First, most dentists will take a VERY accurate impression of the tooth he has
just worked on. This will feel like the impressions he has taken before of that tooth, but the material he uses will be different, and will smell different! It will take longer to set.
This mold will produce the laboratory model of the tooth that the lab has to work on, to build up your new tooth. (The dental crown). After the dentist is satisfied with the impression (he may need to have 2 or 3 goes at getting a good impression), he will make up a temporary crown in acrylic, to protect your tooth while the permanent crown is being made.
The dentist also needs to check the color that you want the
new crown to be, to match in with your other teeth. Dentists call this "the shade". He may also take
some photographs to send to the lab to help. He may ask you to get out of the dental chair and to go near a window to get some natural daylight shining on your teeth.
Then he may give you a face mirror, and show you the color samples (shade tabs) that he thinks will match the neighboring teeth, so that the new crown will blend in with your other teeth and look natural. He'll ask your opinion of the shade tab he's chosen - he wants you to check it, and say if you think it's not quite right!
What Is a
Tooth Crown?
Getting the crown made in a dental laboratory can take a week or 2, and to get you through that that time your dentist will fit a temporary crown to protect your prepared tooth, "fill the gap", and allow you to smile and eat without people thinking you have a tooth missing! The temporary crown will usually be made of acrylic, and be tooth-colored. The color may not be a perfect match to your other teeth, but will be very close.
He will make up the temporary crown by putting a liquid acrylic mixture into the
impression of your teeth he took at the start of this appointment, and then put the impression back in your
mouth, over the teeth. He will have to press this into pace quite firmly to make
sure it's in the correct position, so don't worry if it seems he's pressing hard! It's normal.
After a few minutes, the acrylic will have set hard. The dentist can then take the impression out of your mouth, and the acrylic "crown" will be left in place on your drilled-down tooth. He can then inspect the appearance of the acrylic. If he can see your prepared tooth through the acrylic because it's too thin in one area, he will need to take the temporary crown off and reduce your tooth a fraction more in that area.
Once your dentist is happy with everything, he will send all the impressions, bite recordings and color check to the lab, and fit the temporary crown with an interim cement. He wants to be able to get the temporary crown off at the next appointment without too much trouble!
A week or 2 later, your dentist will have the new crown back from the dental laboratory, and you can go along to the dental office for your third appointment to get it fitted.
READ ON!
What Is a
Tooth Crown?
BUT there's an alternative way of getting the crown made - The second possibility is that, instead of taking a master impression of the trimmed-down tooth for the laboratory, your dentist will use a special small camera to take a digital "scan" of your tooth from different angles. Then he uses a special computer to create a digital image of your tooth on a computer screen, and special software to design the new crown. This is called CAD/CAM technology, and the dental machine is called Cerec. This was invented back in the 1970's, and took some time for technology to catch up with the inventor's original vision.
You can read more about how this system works at my page on CEREC veneers HERE.
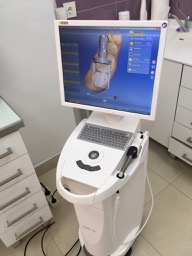 Cerec CAD/CAM computer
What happens after the dentist has designed the crown on the computer?
A special dental milling unit then mills out the crown from a solid block of ceramic, exactly and precisely to the dentist's design! This takes around 10 to 15 minutes, and you get to have a little break, maybe even a small drink.
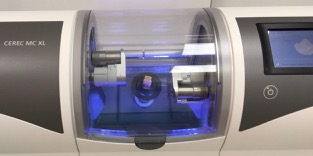 Cerec milling unit
After the Cerec unit has finished milling your new crown, your dentist will take it out of the machine, and polish the edges briefly to get rid of any tags. Then he can put the new Cerec crown onto your prepared tooth, and check that it fits properly. Normally, it will fit like a glove straight away; but sometimes he may need to adjust the crown here and there before he's satisfied.
Then he will polish the new crown to make it smooth and glossy, like a natural tooth, and then let you take a look in the mirror to make sure that you are happy with the result.
Once both your dentist and you are happy with how the new crown fits, the appearance, and the "bite", he needs to fix it into place. He will need to clean the inside of the new crown to get rid of any contamination from things like oil (from the milling unit) and saliva (from your mouth).
Then he will paint on a series of liquids inside the crown, which will create a bonding layer for the dental glue to attach to. After that, he will carefully wash your prepared tooth with a water spray, and paint a series of bonding liquids over the tooth, too. He will dry these off with his little air hose, and maybe "cure" the bonding layer with a miniature ultra-violet light. Then he can put a thin layer of dental "glue" into the crown and put the crown into place over your tooth.
After a few minutes, the glue will be set, and he can trim away any excess glue around the gum line and from in between the teeth. JOB DONE!
Using the CEREC digital CAD/CAM system, your treatment is now complete. You don't have to come back for that third appointment! And that is the main advantage of this technique - it cuts out the need for a dental laboratory, and therefore saves an appointment. It can all be done at one sitting, after the assessment appointment. It also saves the need for a temporary crown, further reducing time and cost.
HOWEVER, if your dentist has taken a normal impression for the dental laboratory, you have to come back to the dental office a third time, to get the crown fitted!
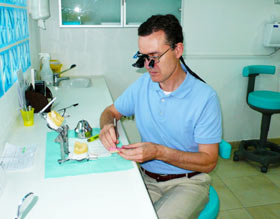 Constructing a crown in the lab.
At the THIRD appointment of a dental crown procedure, your dentist will numb your tooth again first, then wiggle off the temporary crown. And then he can try the new permanent crown in place, and check how it fits, how it meets your other teeth, and how it looks with regard to color and size.
He may need to adjust the crown with a fine polishing tip, to get it to fit between your other teeth, and get the "bite" correct. This is quite normal, so don't worry if your dentist seems to be "fiddling about" with your new crown, and making adjustments to it!
Once he is happy with the fit and position, and YOU are are happy with the overall appearance and color, he can fit it properly with a dental cement.
HOW LONG do these 3 appointments for a dental crown procedure take?
Typically, a dentist will allow 30 minutes for the first appointment, to take the X-rays he needs, take preliminary molds, and check for any issues with the tooth or teeth.
For the second appointment, he will book 45 minutes to 60 minutes, depending on what other additional work the tooth may need. For example, he may want to remove a leaking filling from the tooth, remove decay, then build up a new filling before trimming the tooth down for the crown. This will make the appointment a bit longer.
For the third appointment, to fit the crown, most dentists need 15 minutes to 30 minutes, depending on the complexity of getting the temporary crown off, and anticipated adjustments required to get the new crown to fit properly.
What about the dental crown procedure for a dental implant?
This is quite different to a normal crown, because there is NO DRILLING involved. But the 3 steps are similar to a normal crown;
Around 3 months after the implant went in, you will need to see the dentist for an assessment appointment. He wants to check that the implant has healed properly, and is ready to take a crown. Your dentist will take X-rays, look at the gum, and if the implant is buried under the gum he will numb the area and expose the implant, and then fit a "healing cap" that encourages the gum to take up the correct shape for the planned crown.
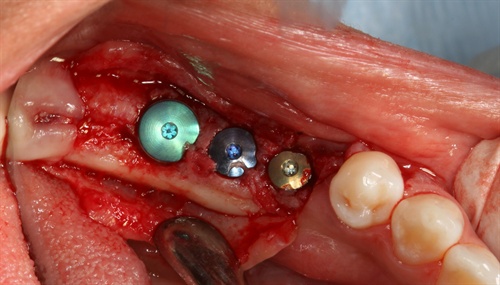 Implant healing caps in position.
At the second appointment some 4 - 6 weeks later, your dentist can unscrew the healing caps, fit an impression post into the implant, and take the impression for the dental laboratory. Then he will re-fit the healing caps.
At the third appointment your dentist will simply unscrew the healing cap, fit the laboratory-made abutment into the implant with a titanium screw, and use a miniature torque wrench to screw it to the manufacturer's specified setting. (Typically 15 - 30 Ncm)
After that, he can put the new crown onto the abutment, either with an interim cement and/or with a small retaining screw. Job done!
What Is a
Tooth Crown?
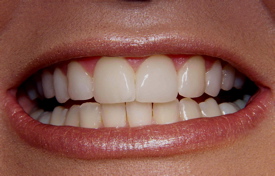 Dental crown procedure
JOB DONE!
Or is it? Sometimes there can be problems with a dental crown. You can read more about these possibilities at my special pages on Dental Crown Problems and also at Pain After Dental Crown.
After you have had your nice new dental crown procedure, you need to be aware of a few things.
- First, don't chew on it for a few hours, to let the glue finish setting.
- Second, clean it like a natural tooth; don't be afraid to brush it and floss it like a normal tooth.
- After that, forget about it, and get on with life!
What Is a
Tooth Crown?
REASONS FOR GETTING A CROWN.
1. Cosmetic.
If you have a tooth (or teeth) that have become discolored for some reason, you can get a dentist to shave down the surface of the tooth and cover it with a dental crown made of porcelain (or ceramic).
ALSO, if you have a tooth that is the wrong shape, for example a "peg" tooth that has developed smaller than normal, or an eye tooth ("canine" tooth) that is more prominent than the ideal - your dentist can shave it down and fit a crown to give it a better shape.
And that means that the dentist has to shave down your natural tooth ("drill the tooth down to a peg") so that the dental crown can fit over it, with the size and shape (and color) to make it look natural. Here's a photo of some dental crowns - before and after.
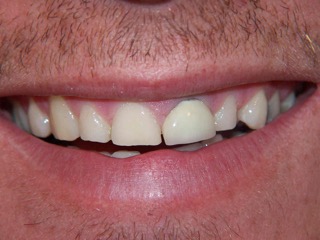 before a dental crown procedure
In the photo above, there are 3 problems that the patient was unhappy about.
- First, there is an old crown on the front right tooth (as you look at the image - it has a dark shadow at the gum line.)
- Second, the teeth are uneven, worn down, and look small.
- Third, the teeth are a little too dark for the patient - he wanted them whiter, straighter, and more even.
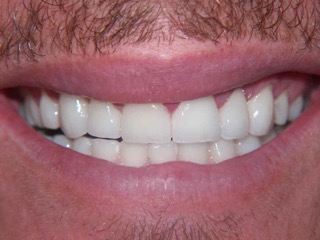 AFTER a dental crown procedure
After the dental crown procedure, we have put crowns on 8 front teeth. The teeth now look even, straight, and of course whiter than before.
2. To protect a tooth. The next main reason you might want to have a dental crown is to protect a tooth that has been weakened by decay and big fillings. Sometimes the side of a heavily-filled tooth will fracture off, leaving 3/4 of the tooth and filling behind.
In this situation, it may be possible to build up the tooth again with a big / huge filling, but it won't be very strong. It's likely to fracture again.
A crown, being like a thimble, covers the entire tooth and filling, and
protects it from the tooth above / below, preventing another fracture. HOWEVER the dentist may want to remove all the old filling material first, clean out the cavity, and bond in a new filling, to make sure that he is putting the crown on a stable and strong foundation.
3. Root canal treatment. Thirdly, if you have had a root canal treatment, the tooth will normally need a crown over it to ensure that bacteria don't get back into the tooth. A dental crown will create a better seal over the root canal filling than a filling alone, especially for back teeth (molars).
For front teeth (incisors) it's less common to get a crown after a root canal, unless the tooth is broken down or fractured.
4. Dental implant. Fourthly, if you have had a tooth extracted and a dental implant put in, you will need a crown fitted to the implant to complete the tooth replacement treatment. No drilling required, but more impressions!
What Is a
Tooth Crown?
I hope I have answered your question "What is a tooth crown?".
REMEMBER, there are different materials and designs of dental crown - read more about your options at Dental Crown Cost.


